Snowflake provides an extension for Visual Studio Code (VS Code) to enable Snowflake users to write and execute Snowflake SQL statements directly in VS Code. Extensions are pre-packaged functionality, often provided by third parties, which add new features and functionality to VS Code.
Installing the Snowflake Extension for Visual Studio Code
Snowflake users can install the VS Code extension directly from the Visual Studio marketplace, or download the extension, packaged as a .xsix file, and then install.
Installing from the Visual Studio Marketplace
To install directly from the Visual Studio Marketplace, do the following:
Open Visual Studio Code.
Select Code » Preferences » Extensions.
You can also select View » Extensions or click the extensions button
 in the VS Code Activity Bar.
In the Search Extensions text box, enter the text Snowflake to search for the Snowflake Visual Studio Extension.
From the set of extensions, select the extension authored by Snowflake and click Install.
Installing from a .vsix file
To download and install from a .vsix file, do the following:
Download the extension.
Open the page Snowflake Visual Studio Code extension.
Select the Version History tab.
Select a version to download and click Download. Note where the file is downloaded.
Open Visual Studio Code.
Select Code » Preferences » Extensions.
You can also select View » Extensions or click the extensions button
in the Activity Bar.Select Install from VSIX from the more(…) menu.
Locate the
snowflake-x.y.z.vsixfile on your computer, select the file, and then select Install.
After the installation completes, the Snowflake Extension for Visual Studio Code appears in the INSTALLED section of the Extensions menu in VS Code.
Signing In
Before you can execute SQL statements you must sign into a Snowflake account.
You can sign into Snowflake using your Snowflake account identifier, username, and password, or using federated authentication to Snowflake using SAML SSO.
The first time you sign into Snowflake from the VS Code extension, you need to add your account by entering either the account identifier for your Snowflake account or the URL that you use to connect to Snowflake.
See Account Identifiers for details on how to determine your account identifier.
To sign into Snowflake from the VS Code extension, do the following:
In the Activity Bar, click the Snowflake icon.
The side bar panel changes to Snowflake navigation, and displays the Add Account or Sign in dialogs.
Under Add Account, enter either the account identifier, and elect Continue.
Add Account is only displayed if no account was previously specified.
Enter a username and password for the selected account and select Sign in.
On successful sign in, the sidebar changes to display the session context (ACCOUNT), DATABASE EXPLORER for the user in their default role, and QUERY HISTORY.
Using Snowflake Extension for Visual Studio Code with SnowSQL configuration files
The Snowflake Extension for Visual Studio Code can use Snow SQL configuration files for loading connection configurations.
Only connection configuration values are used. Other SnowSQL configuration values are ignored.
To configure Snowflake Extension for Visual Studio Code to use a Snow SQL configuration file, do the following:
In the Activity Bar, select the Snowflake icon.
The side bar panel changes to Snowflake navigation, and displays the Add Account or Sign in dialogs.
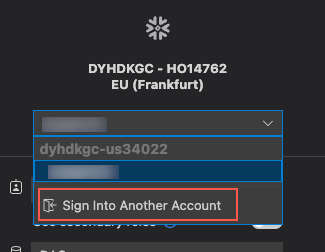
Select the Username drop down, and then select Sign in to another account.
Select Use SnowSQL Config. The Visual Studio code settings page for the Snowflake Extension for Visual Studio Code opens with SnowSQL Config Path selected.
Enter a path to a valid SnowSQL configuration file.
The account drop down updates to include all connections defined in the specified configuration file.
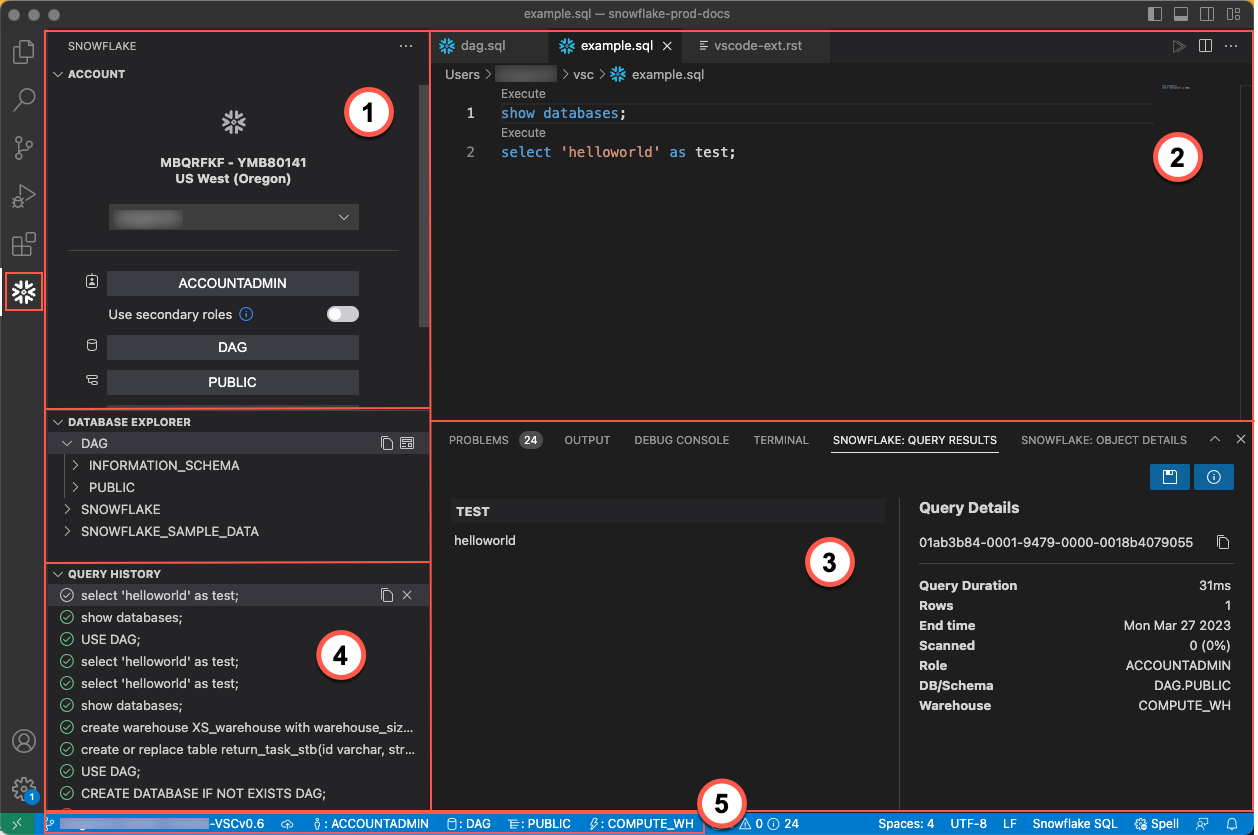
Navigating the Snowflake Extension for Visual Studio Code Interface
The Snowflake Extension for Visual Studio Code has the following main sections:
Sidebar panel (1): The leftmost panel is the Account, Database Explore and Query history pane.
Use this panel to specify account details, examine database objects, and examine query results.
The Snowflake SQL panel (2): The Snowflake SQL panel displays Snowflake SQL files.
Query Results panel (3): The query results panel shows the results of queries.
Select a query in the Side Bar » Query History to display its execution result(panel 4).
Query History section of Side Bar (4): Query history shows recent queries.
Current session (5): Current session information, including current role, database, schema, and active warehouse.
Snowflake icon (not numbered) - Select the Snowflake icon to display or hide the Side Bar panel.
Working with SQL Files
You can use the Snowflake Extension for Visual Studio Code to create and load SQL files. SQL files are simple text files that contain one or more SQL statements.
Opening SQL Files
To create or open Snowflake SQL files, do the following:
Select File » Open, navigate to and open a text file containing SQL.
If you don’t have an existing SQL file, you can create a new one. Select File » New File and create a file of type Snowflake SQL File. Alternatively, select (
 ) in the Database explorer panel to create a new SQL file.
Add one or more Snowflake SQL statements to the file.
Select a line and press [Execute], above the line, to execute the command.
Executing Commands or Queries
To execute one or more commands or queries, do the following:
Select the
 for the selected SQL file to execute all statements in that file.
Select a line to run by placing your cursor on the statement to be run.
Select two or more commands - All selected commands will be executed.
Press the [Execute] button above the first command selected.
If you select multiple commands, the commands execute in order from top to bottom.
You can also run statements using keyboard shortcuts. After selecting the SQL statements you want to run, press ![]() + [enter] on a Mac keyboard, or
+ [enter] on a Mac keyboard, or ![]() + [enter] on a Windows keyboard.
+ [enter] on a Windows keyboard.
You can see the results of the SQL statement in the SNOWFLAKE:QUERY RESULTS table of the Output section.
In-progress queries can be cancelled. To cancel a query in process, find the query in QUERY HISTORY and select cancel query (![]() ).
).
Using Query History
Query results are tracked in QUERY HISTORY.
To examine previously executed query results, do the following:
Expand Query History.
Select a statement.
Examine the result in the SNOWFLAKE:QUERY RESULTS tab of the Output pane.
You can use the Query History to rerun a query( ), copy the query text to the clipboard(
 ), or delete a query (
 ).
).
Working with Query Results
You can sort, reorder, hide, freeze, or save query results to disk.
To modify the display of a given query, do the following:
In QUERY HISTORY, select a query.
In QUERY RESULTS, choose a column.
Select the down arrow (↓) and then one of: SORT A-Z (descending), Sort Z-A (ascending), Hide column “column name”, or Freeze columns up to “column name”.
The content display will change appropriately.
If a column was previously hidden, choose any other column and select Unhide N columns.
To save the results of a query to disk, select either disk ( ) or download (
![]() ) associated with the query. Contents will be saved in a file, either as a compressed gzip, or as a comma-separated file.
) associated with the query. Contents will be saved in a file, either as a compressed gzip, or as a comma-separated file.
Changing Session Context
You can use the Account section of the Side Bar panel to select roles, databases, schemas, and warehouses. Use the associated dropdown to select each as appropriate.
Use the account drop down to sign into, or switch between different accounts.
Navigating with the Database Explorer
Use the DATABASE EXPLORER section of the Side Bar panel to examine and display characteristics of database objects.
To examine a database object, do the following:
Sign into an account.
Expand the DATABASE EXPLORER section of the Sidebar panel.
Select a database and expand it.
Select a schema and expand it.
Navigate to a child component.
Select any element to see its characteristics in the SNOWFLAKE:OBJECT DETAILS tab of the Output pane.
Use the view object details button ( ) to display the details of the associated object. Use the view object DML button (
 ) to display the DML used to create the object.
When examining the details associated with a table, view, materialized view or similar object, select preview ( ) to display a preview of up to 100 rows of content.
Working with Stages
The Snowflake Extension for Visual Studio Code supports managing stage content directly in the Database Explorer. You can:
List all the files in a stage:
Navigate to a specific stage.
Expand the stage to see all staged files.
Upload files from the local file system to a stage, similar to PUT:
Navigate to the stage, and select upload (
).
Enter any optional parameter for the upload operation. Refer to PUT for a list of optional parameters.
Navigate to the folder containing files for upload, selecting one or more files and upload.
Download files from a stage, to a local file system, similar to GET:
Navigate to stage.
Select download (
Select a file and download that file.
Select a directory to complete the download.
Remove files from a stage, similar to REMOVE:
Select a file.
Select the associated remove button (
).
The Snowflake Extension for Visual Studio Code only supports upload for internal stages, all other operations work for both internal and external stages.
View Extension Details
You can view the Snowflake SQL Visual Studio Code extension information at any time.
You can see the following details about the extension, including:
Version information: Which version of the extension is currently installed.
Changelog: Information by version about features added, changed, or updated.
Feature walkthroughs.
In addition, you can disable or enable the extension using the enabled/disable dropdown.
To view extension information, do the following:
Select Code » Preferences » Extensions.
Select the Snowflake VS Code SQL extension.
You can also select View » Extensions or click the extensions button
in the Activities bar.
Extension Settings
The Snowflake Extension for Visual Studio Code supports the following settings:
Setting | Description | Default |
|---|---|---|
Export CSV » Delimiter | Specifies delimiter for columns | Comma |
Export CSV » Header | Enable inclusion of header row in exported CSV file | Enabled |
Export CSV » Include Empty Rows | Enable inclusion of empty rows in exported CSV file | Exclude |
Export CSV » Quotes | Enable double quotes around all values in exported CSV file | Enabled |
Highlight Query | Enable background highlight on the current SQL statement | Enabled |
Show Execute Above Statement | Enable a clickable execute action above each statement | Enabled |
Snowsql Config Path | If set, connection configuration will be loaded from this file. | Unset |
To change extension settings:
On Windows/Linux select File » Preferences » Settings. On macOS select Code » Preferences » Settings.
In the Search settings text box enter Snowflake.
Select the User or Workspace tabs to view or modify user specific or workspace specific settings.
Close the Settings tab.
Uninstalling the Extension
To disable or uninstall the extension, do the following:
Select Code » Preferences » Extensions
Select the extension.
Right-click and choose Disable or Uninstall.